


What Is the First Step in Cleaning a Firearm? A Complete Beginner's Guide
If you've just purchased your first firearm or recently started visiting the range, you've probably heard that regular cleaning is essential. But when you sit down to maintain your gun for the first time, one question matters more than any other: what is the first step in cleaning a firearm?
The answer is straightforward and non-negotiable: verify that the firearm is completely unloaded. Before you touch a cleaning rod, open a bottle of solvent, or lay out a single patch, you must confirm there is no ammunition in the chamber or magazine. This isn't a suggestion — it's the foundational safety rule that every responsible gun owner follows without exception.
In this guide, we'll walk through the entire firearm cleaning process from start to finish — beginning with that critical safety check, through workspace setup, disassembly, cleaning, lubrication, and reassembly. Whether you own a handgun, rifle, or shotgun, these principles apply across the board.
Safety First: The Actual First Step
Every hunter education course, every NRA training module, and every firearms manufacturer agrees: the first step in cleaning a firearm is to make sure the gun is unloaded. According to the four fundamental rules of gun safety, you should always treat every firearm as if it's loaded — and that includes during cleaning.
Here's exactly how to verify your firearm is safe to clean:
- Point the muzzle in a safe direction. Even when you believe the firearm is unloaded, maintain muzzle discipline at all times. A safe direction means a direction where an accidental discharge would not cause injury or damage.
- Remove the magazine or ammunition source. For semi-automatic pistols, press the magazine release and physically remove the magazine. For revolvers, open the cylinder and remove all cartridges. For rifles and shotguns, remove the magazine or empty the tube.
- Lock the action open and visually inspect the chamber. Pull the slide back (pistol), open the bolt (rifle), or open the action (shotgun) and look directly into the chamber. Confirm it is empty. Use your finger to physically feel the chamber if lighting is poor.
- Remove all live ammunition from the room. This eliminates any possibility of accidentally chambering a round during the cleaning process. Place ammunition in a separate room or sealed container away from your workspace.
This safety verification should become automatic — a ritual you perform every single time without exception. Negligent discharges during cleaning are preventable, and this procedure is how you prevent them.
Setting Up Your Cleaning Workspace
Once you've confirmed the firearm is unloaded and ammunition is secured away, it's time to set up a proper cleaning area. A good workspace makes the process easier, more thorough, and less messy.
Choose the Right Location
Work in a well-ventilated area. Gun cleaning solvents produce fumes that can cause headaches, dizziness, and irritation with prolonged exposure. A garage with an open door, a covered patio, or a room with open windows and a fan are all good choices. Avoid small, enclosed spaces without airflow.
Protect Your Work Surface
Lay down a gun cleaning mat or several layers of newspaper. Solvents and lubricants will stain wood, fabric, and many other surfaces. A dedicated cleaning mat with a rubberized backing also keeps small parts from rolling away — and trust us, springs and pins have a way of disappearing at the worst possible moment.
Gather Your Tools Before You Start
Having everything within reach before you begin prevents frustration and keeps you from handling a partially disassembled firearm while rummaging through drawers. Here's what you need:
- Cleaning rod or bore snake — sized appropriately for your caliber
- Bore brush (bronze or nylon) — matched to your caliber
- Cleaning patches — cotton or synthetic, correct size for your bore
- Bore solvent — for dissolving carbon, copper, and lead fouling
- Gun lubricant (oil) — for reducing friction on moving parts
- Protectant — for long-term rust prevention on metal surfaces
- Nylon utility brush (old toothbrush works) — for scrubbing the action and frame
- Microfiber cloths or clean rags — for wiping down surfaces
- Cotton swabs — for reaching tight spaces and corners
- Your firearm's owner's manual — for disassembly instructions specific to your model
If you're just getting started and don't have individual supplies, a quality gun cleaning kit is the most cost-effective way to get everything you need in one purchase. Most kits include bore brushes, cleaning rods, jags, patches, and basic solvents for multiple calibers.
Wear Appropriate Protection
This step is often overlooked by beginners. Gun cleaning solvents contain chemicals that can irritate skin with repeated exposure. Nitrile gloves protect your hands, and safety glasses shield your eyes from solvent splashes and the occasional spring that launches itself during disassembly. ANSI Z87.1-rated eye protection — the same standard that protects you at the range — works perfectly for the cleaning bench too.
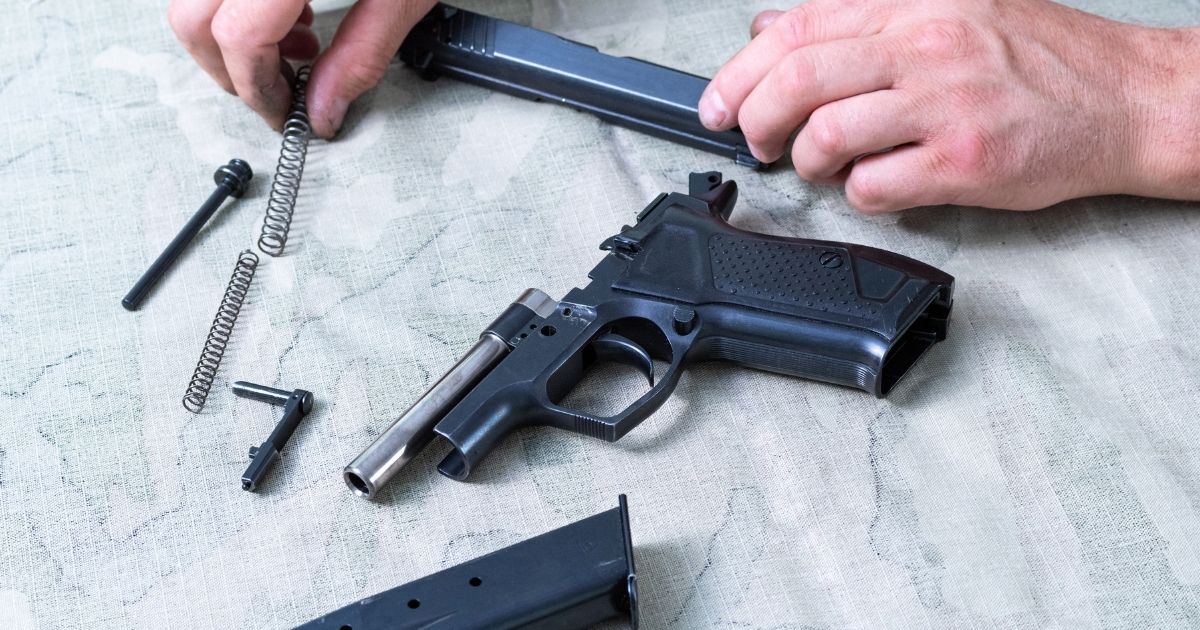
Disassembly Basics: Field Stripping Your Firearm
Field stripping is partially disassembling your firearm into its major components for cleaning. This is different from a full detail strip — removing every pin, spring, and small part — which should generally be left to experienced gunsmiths.
A field strip gives you access to the bore, chamber, bolt or slide, frame, and recoil spring — all the areas where fouling accumulates most. For routine cleaning, field stripping is all you need. Every firearm model has its own disassembly process, so always consult your owner's manual for model-specific instructions. Here's the general approach for common types:
Semi-automatic pistols typically field strip into five components: slide, barrel, recoil spring and guide rod, frame, and magazine. Most modern pistols use a takedown lever or pin system for tool-free disassembly.
Bolt-action rifles usually require removing the bolt assembly from the receiver.
Pump and semi-automatic shotguns generally separate into the barrel, forend, bolt assembly, and receiver/stock.
Revolvers typically don't require field stripping for routine cleaning — clean the bore, chambers, and exterior with the cylinder open.
Tips for First-Time Disassembly
- Watch a video specific to your exact make and model before attempting disassembly for the first time
- Take photos at each step so you have a reference for reassembly
- Don't force anything — if a part isn't moving, you're likely missing a step
- Keep small parts organized by placing them in order on your cleaning mat or in a small tray
- Work over the mat — recoil springs are under tension and will launch across the room if you're not careful
The Cleaning Process: Step by Step
With your firearm field stripped and your tools ready, it's time to clean. The process follows a logical order: bore and chamber first (the dirtiest areas), then the action components, then the frame and exterior.
Step 1: Clean the Bore
The bore — the inside of your barrel — accumulates the most fouling. Carbon, copper, and lead deposits build up with every round fired, and if left unchecked, they degrade accuracy and can eventually cause damage.
Always clean from the breech (chamber) end when possible. Cleaning from the muzzle end risks damaging the crown — the precisely machined edge at the barrel's exit point — which directly affects accuracy. If your firearm doesn't allow breech-end access (some rifles, for example), use a muzzle guard to protect the crown.
Here's the bore cleaning process:
- Apply solvent. Attach a patch holder or jag to your cleaning rod, place a solvent-soaked patch on it, and push it through the bore from breech to muzzle. Let the patch exit fully — don't pull it back through, as this just redeposits fouling.
- Let the solvent work. Allow the solvent to sit for 3 to 5 minutes. The chemicals need time to dissolve carbon and metallic fouling. For a heavily fouled barrel, you may need to wait longer.
- Scrub with a bore brush. Attach a bronze or nylon bore brush to your cleaning rod and make 10 to 15 full passes through the barrel. Push the brush completely through before reversing direction — don't reverse the brush inside the bore, as this can damage bristles and reduce effectiveness.
- Patch until clean. Run dry patches through the bore one at a time until they come out clean. If patches still show significant fouling after several passes, apply more solvent and repeat the brush-and-patch cycle.
- Final protection pass. Run one lightly oiled patch through the bore to leave a thin protective film against moisture and rust. Note: if you plan to shoot the firearm soon, run a dry patch through immediately before your next range session to remove this oil.
Step 2: Clean the Chamber
The chamber — where the cartridge sits when the gun is loaded — collects powder residue and carbon. Use a chamber brush (slightly larger than a bore brush) or a solvent-soaked patch wrapped around a bore brush to scrub the chamber walls. Follow with dry patches until clean.
For semi-automatic pistols, pay attention to the feed ramp — the angled surface that guides cartridges from the magazine into the chamber. Carbon buildup here can cause feeding malfunctions. Clean it with a nylon brush and solvent.
Step 3: Clean the Action
The action — the moving mechanical parts that load, fire, and eject cartridges — is where reliability lives. A dirty action is the most common cause of malfunctions like failures to feed, failures to eject, and failures to return to battery.
For semi-automatic pistols: Clean the slide rails, breech face, extractor, and firing pin channel. Use a nylon brush with solvent to scrub carbon deposits, then wipe clean with patches or a cloth. Pay special attention to the extractor claw — carbon buildup here causes extraction failures.
For bolt-action rifles: Clean the bolt face, extractor, and locking lugs. These areas accumulate significant carbon and brass residue.
For shotguns: Clean the bolt face, shell lifter, and action bars. Carbon and plastic wad residue are the main culprits.
Cotton swabs are invaluable for reaching tight corners and small recesses in the action. Use them liberally.
Step 4: Clean the Frame and Exterior
Wipe down the frame (or receiver) with a solvent-dampened cloth to remove residue, fingerprints, and debris. For pistols, pay attention to the rail grooves where the slide rides — dirt here causes increased wear. Wipe exterior metal surfaces to remove skin oils, which contain salts that accelerate corrosion on blued steel finishes.
Understanding Solvents, Lubricants, and Protectants
One of the most confusing aspects of firearm maintenance for beginners is the variety of cleaning products available. Understanding the three categories — and why each one matters — will make you a more effective gun owner.
Cleaning Solvents
Solvents are aggressive chemical formulations designed to dissolve fouling. They break down carbon deposits, copper jacket material, lead residue, and powder fouling. Solvents are meant to be applied, allowed to work, and then removed — they shouldn't stay on the firearm long-term.
Common bore solvents include Hoppe's No. 9, Bore Tech Eliminator, and Break-Free Powder Blast. For heavy copper fouling, specialized copper solvents are more effective than general-purpose cleaners.
Lubricants
Lubricants reduce friction between metal surfaces that move against each other. They prevent wear, ensure smooth operation, and contribute to reliable function. Gun oils and greases are the two main types:
- Gun oil has low viscosity, flows easily, and is ideal for slide rails, trigger mechanisms, and other moving parts that require minimal resistance
- Gun grease has higher viscosity, stays in place longer, and is better for high-friction contact points like locking lugs and rail interfaces
Critical rule: Apply lubricant sparingly. Over-lubrication attracts dust and debris, creating an abrasive paste that accelerates wear rather than preventing it. A thin film on contact surfaces is all you need. Apply one drop at each lubrication point and spread it with a clean patch or your finger.
Protectants
Protectants create a barrier against moisture, oxygen, and corrosive elements. They're especially important for firearms in storage, firearms carried in humid environments, and any gun with a blued or parkerized finish. Some protectants contain wax compounds that provide longer-lasting protection than oil alone.
CLP: The All-in-One Option
CLP stands for Clean, Lubricate, and Protect — an all-in-one product originally developed for the U.S. military. Products like Break-Free CLP and Ballistol attempt to serve all three functions in a single bottle. For beginners and casual shooters, a quality CLP is convenient and perfectly adequate for routine maintenance.
However, dedicated solvents outperform CLP for bore cleaning (especially copper fouling), and dedicated lubricants provide better long-term friction reduction. As your collection grows, you may find that a three-product system delivers better results.
How Often Should You Clean Your Firearm?
Cleaning frequency is one of the most debated topics in the firearms community. Here's a practical framework based on how you use your guns:
After Every Range Session
This is the gold standard and the recommendation we support for most shooters — especially beginners. Cleaning after every range trip offers several advantages:
- Fouling is easier to remove when it's fresh rather than baked on
- You inspect your firearm regularly, catching potential issues early
- You develop proficiency with disassembly and reassembly through repetition
- Your firearm is always in known good condition
A basic post-range cleaning doesn't need to take long. Once you've done it a few times, a field strip, bore cleaning, action wipe-down, and light lubrication takes 15 to 20 minutes for a handgun.
Concealed Carry and Home Defense Firearms
Firearms you rely on for personal protection deserve extra attention. Clean and inspect your carry gun at least every two weeks, even if you haven't fired it. Body oils, sweat, lint from holsters and clothing, and environmental moisture all accumulate and can compromise reliability when it matters most.
Firearms in Storage
Guns that sit in a safe or cabinet still need periodic maintenance. Clean and oil stored firearms every 3 to 6 months at minimum. Store them in a climate-controlled environment when possible, and use silica gel packs or a dehumidifier in your safe to control moisture. Humidity is the primary enemy of stored firearms — it causes rust and corrosion even in a sealed environment.
High-Volume Shooting
If you shoot competitively or go through significant round counts at the range, cleaning after every 200 to 500 rounds is a reasonable interval. Some modern firearms can run thousands of rounds between cleanings, but regular maintenance extends the life of your barrel and action components.
Common Gun Cleaning Mistakes to Avoid
Even experienced shooters sometimes develop bad habits. Here are the most common mistakes and how to avoid them:
1. Skipping the Safety Check
We can't emphasize this enough. The first step — verifying the firearm is unloaded — is the most important step in the entire process. Never become so comfortable that you skip this procedure. Complacency causes accidents.
2. Cleaning from the Muzzle End
Whenever your firearm allows it, clean from the breech end. Repeatedly pushing a cleaning rod through the muzzle end can wear or chip the barrel crown, degrading accuracy over time. If you must clean from the muzzle, use a bore guide to protect the crown.
3. Over-Lubricating
More oil does not mean better protection. Excess lubricant attracts dirt, dust, and debris that mix into a gritty compound, accelerating wear on the very parts you're trying to protect. Apply a thin film to moving parts and wipe away the excess. If you can see oil pooling or dripping, you've used too much.
4. Using Household Products
WD-40, motor oil, household cleaners, and cooking oils are not gun cleaning products. They lack the proper formulation for firearms and can damage finishes, degrade polymer frames, and leave residues that attract fouling. Always use products specifically designed for firearm maintenance.
5. Not Allowing Solvent to Work
Applying solvent and immediately wiping it off defeats the purpose. Chemical solvents need 3 to 5 minutes of dwell time to dissolve fouling effectively. For heavily fouled barrels, longer soak times — or multiple solvent applications — may be necessary.
6. Neglecting the Owner's Manual
Every firearm has specific lubrication points, disassembly procedures, and maintenance recommendations from the manufacturer. Your owner's manual is the single most authoritative source for maintaining your specific gun. Read it before your first cleaning session, and refer to it regularly.
7. Forgetting to Function Check After Reassembly
After reassembly, always perform a function check. With the gun verified unloaded, confirm the slide or bolt cycles smoothly, the trigger functions, the safety engages and disengages, and the magazine seats properly. If something doesn't work correctly, a part is likely installed incorrectly.
Essential Gun Cleaning Tools for Beginners
Building your cleaning kit doesn't require a massive investment. Here's a prioritized list of what to buy first:
Must-Have Tools
- Bore snake or cleaning rod — A bore snake is faster for quick cleanings; a rod with jag and brush is more thorough for deep cleans. Ideally, have both.
- Bronze bore brush — Sized to your caliber. Bronze is soft enough not to damage your barrel but effective at scrubbing fouling.
- Cleaning patches — Buy in bulk. You'll go through more than you expect.
- Bore solvent — Hoppe's No. 9, Break-Free CLP, or Bore Tech Eliminator are all solid starting choices.
- Gun oil — A small bottle lasts a long time when applied correctly.
- Nylon utility brush — For scrubbing the action, frame, and exterior surfaces.
Nice-to-Have Additions
- Cleaning mat — Protects your work surface and keeps parts organized
- Bore guide — Centers the cleaning rod and prevents chamber damage (essential for precision rifles)
- Copper solvent — For removing stubborn copper jacket fouling from rifle barrels
- Pick set — For reaching carbon deposits in tight recesses
- Parts tray — A magnetic tray keeps small pins and springs from disappearing
For a comprehensive breakdown of what to look for in a cleaning kit, check out our guide on gun cleaning kits — it covers everything from basic starter sets to professional-grade options.
Don't Forget Your Range Safety Gear
Cleaning your firearm is just one part of responsible gun ownership. Every trip to the range starts with proper safety equipment — and that means certified ear and eye protection.
A single gunshot produces between 140 and 175 dB depending on caliber, according to the National Institute for Occupational Safety and Health (NIOSH). That's well above the 85 dB threshold where hearing damage begins. In fact, a single gunshot above 140 dB can cause immediate, permanent hearing damage — and recreational shooters are four times more likely to develop noise-induced hearing loss than non-shooters.
TradeSmart Safety range kits are designed for shooters who take both performance and protection seriously. Every kit includes NRR 28 earmuffs, ANSI Z87.1+ certified safety glasses with impact-resistant polycarbonate lenses and anti-fog coating, and the free Range Confidence Course — an online firearms fundamentals course that covers safety, range procedures, and marksmanship basics.
Whether you're a new shooter still learning the fundamentals or an experienced hand building your range bag, quality protection isn't optional. It's the foundation that makes everything else possible.
Explore the full lineup of TradeSmart shooting range kits — backed by a 10-year warranty, free shipping, and 4.6 stars on Trustpilot.
Frequently Asked Questions
What is the very first step in cleaning a firearm?
The first step is always to verify the firearm is completely unloaded. Point the muzzle in a safe direction, remove the magazine, lock the action open, and visually and physically inspect the chamber. Then remove all live ammunition from your cleaning area before proceeding.
Can I use WD-40 to clean my gun?
No. WD-40 is a water displacement formula, not a gun cleaning solvent or lubricant. It leaves residue that attracts fouling and isn't formulated for the pressures and temperatures firearms generate. Always use products specifically designed for firearm maintenance.
How long does it take to clean a handgun?
For a routine cleaning after a range session, expect 15 to 20 minutes once you're comfortable with the process. Your first time will take longer — perhaps 30 to 45 minutes — as you learn the disassembly procedure and develop your technique. Deep cleanings with heavy fouling removal can take 30 minutes or more.
Do I need to clean a new gun before shooting it for the first time?
Yes. New firearms ship with heavy preservative oil or grease for storage and transit protection. Remove this factory coating and replace with proper lubricant before your first range session — field strip, wipe down all components, apply light lubrication to manufacturer-recommended points, and reassemble.
Is a bore snake as good as a cleaning rod?
Bore snakes are excellent for quick cleanings — faster, more portable, and easier to use than a rod-and-patch setup. However, a cleaning rod with a bore brush provides more thorough scrubbing for stubborn carbon and copper fouling. For best results, use a bore snake for routine cleanings and a rod system for periodic deep cleans.
What happens if I never clean my firearm?
Carbon fouling and residue build up in the bore, chamber, and action over time, leading to reduced accuracy, increased malfunctions (failures to feed, extract, or eject), and accelerated wear. Moisture and corrosive residues cause rust and pitting that permanently damage the barrel and action. Regular cleaning preserves both reliability and resale value.
Clean Your Gun, Protect Yourself at the Range
Firearm cleaning isn't complicated, but it requires discipline. The first step — confirming the gun is unloaded — sets the tone for everything that follows. Build a consistent routine, invest in a reliable gun cleaning kit, and treat every range session as an opportunity to practice both shooting and maintenance skills.
And just as you wouldn't skip cleaning your firearm, don't skip protecting your hearing and vision at the range. TradeSmart Safety gear is built for shooters who understand that safety isn't a compromise — it's a commitment.
Shop TradeSmart Safety range kits — NRR 28 earmuffs, ANSI Z87.1+ safety glasses, free Range Confidence Course, 10-year warranty, and free shipping on every order. If you're new to firearms, start with our best beginner handguns guide to find the right first gun for you.


TradeSmart Safety
May 08, 2024
Thank you Kellee, we’re glad you found the information useful!